(This blog entry is a translation and merge of two blog posts previously published in MareaIndie's Spanish blog)
Not long after programmers start using Unity, we learn that we can add new entries to the editor menus easily. It's something as simple as creating a parameterless static method (return type is not relevant) in an editor class (inside any directory called Editor) and use the MenuItem attribute:
[MenuItem("Custom/Scripted Ops")]
public static void ScriptedOps() {
  // Do something
}
From these menu items we can run all kinds of processes, from the simplest to the most complex: validate assets or configurations, generate localization reports, open a new window for a tool...
The best use I've found for this, however, is to simplify the burdersome task of generating builds. And that's because the standard build generation steps are:
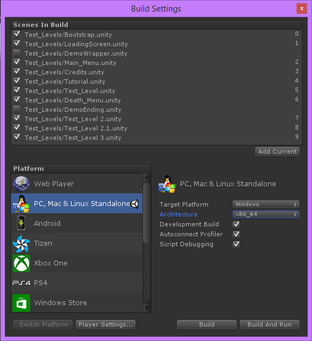
File->Build settings...
Ensure all relevant scenes are selected and the first one is the boot scene.
Check and set the platform (and sub-platform and architecture, if relevant).
Check and set the right options for the build (development, null, checks...).
(Optional) Verify that platform specific settings in Player settings... are properly set.
Press Build.
Select output directory (or create a new one) and executable name.
Accept.
Wait.
Test the build.
If something failed, go back to 2.
If you need to create several builds for different platforms, after waiting you'll need to repeat the same steps. The more platforms you switch between, the longer the process is, and the higher the chances of making a mistake.
Taking advantage of MenuItem, we can create static methods to make builds with preset configurations, saving ourselves a few mistakes and mishaps. At this point, it is important to note that almost any option required to configure builds, no matter the platform, can be set via scripts on Unity. The most common entry points to this functionality are UnityEditor.PlayerSettings and EditorBuildSettings, each including access to platform specific settings.
Heart&Slash is (or will shortly be) available for Windows, Linux, MacOS X, PS4, Xbox One and Tomahawk F1 (a Chinese Android console codenamed Fuze). Even with that wide spectrum of targets, I haven't found an option I needed which could not be set from scripts somehow. But, truth be told, some options require a little more trial and error than I enjoy, until you decypher their meaning and possibilities.
[MenuItem("Builds/Win 64bits/DRM Free")]
public static void BuildWin64NoDRM() {
  string[] levels = new string[] {
    "Assets/Test_Levels/LoadingScreen.unity",
    "Assets/Test_Levels/Main_Menu.unity",
    "Assets/Test_Levels/Credits.unity",
    "Assets/Test_Levels/Tutorial.unity",
    "Assets/Test_Levels/Test_Level.unity",
    "Assets/Test_Levels/Death_Menu.unity"
  };

  UnityEditor.PlayerSettings.runInBackground = false;
  string message = BuildPipeline.BuildPlayer(
    levels,
    "../Builds/DRMFree/Win64/GameTitle.exe",
    BuildTarget.StandaloneWindows64,
    BuildOptions.ShowBuiltPlayer);

  if (string.IsNullOrEmpty(message))
    UnityEngine.Debug.Log("Win64 build complete");
  else
    UnityEngine.Debug.LogError("Error building Win64:\n" + message);
}
Once we have an entry in the menu, the steps required to have a new build are:
Builds->Win 64bits->DRM Free Worldwide
Wait.
Test the build.
If something went wrong, check the project. If changes to anything related to the build code was changed recently, check it's alright. Back to 1.
Of course, nowadays many Unity developers are used to Cloud build, which is pretty much as simple as this. The way it works is similar, with the added benefit of outsourcing the build itself to another machine. Unfortunately, Cloud Build is not available for exotic platforms, mainly consoles.
Most of the things I'll comment in this post can either be done directly from Cloud Build, or executed from there calling static methods.
Some simple things we can do from scripts:
Configure the path in which the build will be generated to include the current date and time.
Configure BuildOptions for development builds (BuildOptions.development | BuildOptions.AllowDebugging).
Include different scenes for demo/release/test build.
And, one of my favourite, we can also create static methods to call some of the others, creating several builds at once:
[MenuItem("Builds/PC All Platforms/DRM Free")]
public static void BuildAllPCNoDRM() {
  BuildWin32NoDRM();
  BuildWin64NoDRM();
  BuildMacOSNoDRM();
  BuildLinuxNoDRM();
}
Now, if we need to create several builds at once, we just need to select the right options and let the PC do it's job. Meanwhile, we can keep working on something else, check twitter or the mail. Remember to check Unity from time, to make sure things are progressing nicely, and once it's finished, check the builds.
The Cloud Build equivalent to that would be running several targets at once.
One other important aspect to take into account is that these static methods can be used from Jenkins or any other Continuous Integration system you use (even if it's just a few batch files). Editor static methods can be invoked as pre-build, build or post-build commands using Unity's command line arguments:
"C:\Program Files\Unity\Editor\Unity.exe -quit -batchmode -executeMethod BuildWin64NoDRMWorldwide"
Cloud Build lets us configure methods to call before and after starting to work on the build, so this approach can be used, too.
There are some other tasks which are a little harder to integrate into Cloud Build, but most are still usable as commands. We'll check some of them in the next pages.
For what's coming next, I first need to give a little bit of context. Heart&Slash currently has:
7 platforms: Win32, Win64, Linux, MacOS X, PS4, Xbox One and Tomahawk F1.
10 text languages: English, French, Italian, German, Spanish, Russian, Simplified Chinese, Traditional Chinese, Korean and Japanese