This is a making note about Dungeon999F. I made a dungeon999F as oneman army, and I hope this could be helpful to all prospective One man armys.
Game introduction : https://www.behance.net/gallery/26236031/Dungeon999F?
At first I tried to write something like a journal to show you the chronological sequence of developing the game, but at the point where the game is already completed, I had a dim recollection of the process and thus was afraid of romanticizing the past based on faint memory. So I decided to write down the keywords that came to my mind. Then it became much conveneint for others to read. I hope this could be helpful to all prospective One man armys. So let us start now!
1. Secure graphic resources.
Perhaps this is because I was a designer originally, but when I first start brainstorming ideas for a new game, I like to decide the overall atmosphere of the game more than waiting for an innovative idea. Another reason for this is because the mass production of graphic resources is very difficult, as I'm a single developer :( Unlike when you are working with teammates with different roles, graphic resources are very important materials in the developing process itself to a single developer, not only in game. I believe that one person can make enough resources alone if the tone and making process of the game are precisely decided at the beginning. There are many ways to make these - for instance you could use a pixel art or 3D modeling- but I don't recommend a certain one over another. It's important to to find what fits the developer the best. In my case I can do 3D modeling and post-production, so I always use these two techniques to make resources. Now I'll explain the process one by one.
- Character
Things may differ depending on each game, but in most cases I believe that making character resources is the most important part.
Fortunately I had made some characters before starting this project. They were made in very ambiguous tone, not pixel nor 3D images, and thus were left behind in the Work folder for a long time.But the process structure I had composed for those was very fast(almost 1 character a day), so I decided to adopt the same process in this project too.When I make a character like this one, I go through these procedures.
Sketch -> Modeling -> Rendering -> Pixelate -> Individual revisions and effect addition -> Sprite
Let's start with sketching...
You might say 'are you kidding?!' but it's true... I'm not very good at drawing...
One of the reasons I work on 3D is because of my drawing.
Anyway, I draw the bluesketch in my head and then proceed on modeling. After modeling I plant the joints and design animations at the same time. The strong point of 3D work is that you can reuse the animation you've made before. Of course making new animation according to every charcter to emphasize different characteristics would be desirable, but considering that I'm developing all these myself, it's not a bad choice to find a moderate alternative..(Maybe I'm just self-justifying..)


After the modeling and animation work are done, I move on to rendering process.
The final resource would look like 2D anyway, so I didn't work so hard on it. It's extremely important to label the animation parts by naming to organize them easily later, or you might get confused on which part was the one you wanted.
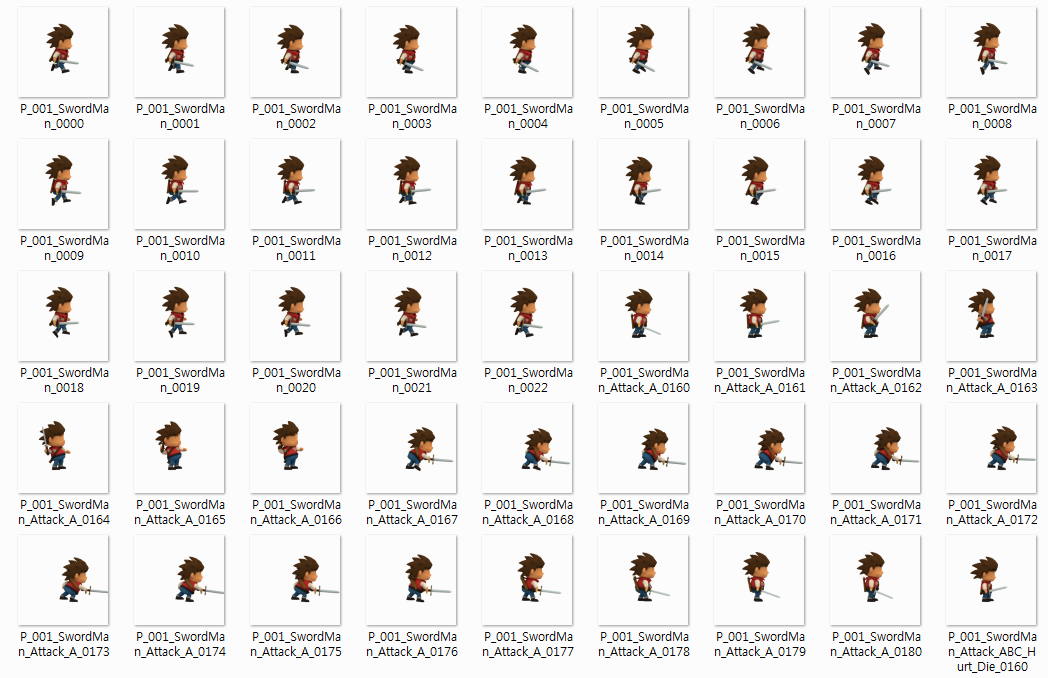
Use a tool like After Effect to draw the outline and face on the rendered resource, and it's done!

Previously I had processed the face in 3D program, but in this project I tried framing the facial expression one by one. It takes twice as long, but you can describe the face in a more cartoon-like expression this way.
Now that the main characters are done, I should make slimes, another important character of the game. I started by sketching it...

Yes... when I have the bluesketch in my head, the outcome on paper tend to be a bit messy...
Now I do the modeling and animation work just like I did for the main characters,

render this, open it in After Effect to draw the face, outline and apply effect separately

I've never been a professional animator so the result was not that great, but it was still usable so I began to mass produce. I wrote the process quite simple here, but I have tested techniques other than this one. There's no fixed answer to the question of what process one should use, so you can use another method if that fits you better. Alright. I decided to start the mass production, so I made different forms of slimes from the prototype, applied the same animation, and rendered the resource.
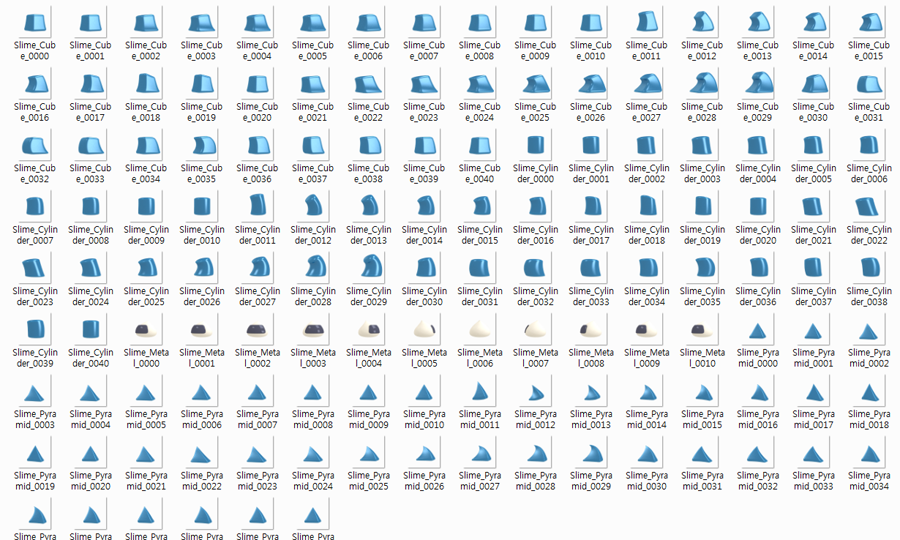
They look very similar don't they...
I changed the resource from the previous work, switched the color and relocated the face to generate various slimes. I say it's 'various', but the process was mostly 'copy and paste'. In fact the reason why only slimes emerge in the game is because I wanted to reduce the resource I had to work on.
- Background Resource
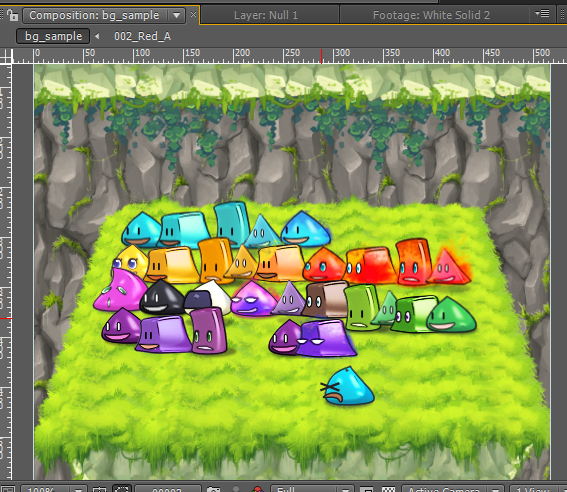
Since I usually like making characters and they are essential part of the game, I didn't have much trouble completing the characters. But in the case with background resources(plus when I'm developing this alone), was a different story. To maintain the overall tone of the game, making it myself would have been the best choice, but thanks to my occupation which I get to look around many graphic resources in Unity's 'Asset Store', I was recommended this fine map editor!!

Later I found out that it actually was a great program.
There were amusing functions like pen tool from Photoshop or automatic impinging region generator, but for a relatively simple game like Dungeon 999F, this editor was too much and didn't feel very suitable. What I needed for Dungeon 999F was actually a simple terrain texture, not the map editing function. So I just adopted the texture in the program and produced another type of map.
If you are planning to use external resources like me, I would recommend you to edit the part you need for the game because that's much effective in terms of capacity and efficiency.

-Item
At first I planned to use external resources for the items because there were tons of well-made resources already, but then it came to me that using too much of external resources could spoil the overall tone of the game. So decided to make some basic items myself.
Sure, this could be a waste of time considering that it's a single-developing project, but I tried it just as a practice. I started by sketching. Since I didn't want to do the modeling with the items, I sketched them in more detailed manners.

After the sketch is done, all you have to do is draw the image using a graphic tool like Photoshop.
There are largely two methods in making an image of this kind. First you can use a tablet pen(or just mouse is fine) to shadow the line. Second, you can use Pentool to fill the color in a certain area. This way you would have your result as a vector image.
Personally, I consider whether the resource is recyclable very important, so I choose the second method to make the image(The truth is... I'm not good at using the brush). Producing a vector image is more hard labor than drawing, but there's an advantage that you can have an image of similar state by changing the figures slightly even when you increase the size. You don't know when you'll have to make another image when you're developing a game alone, so I judged that it would be better to make reusable resources, whatever they are.

Items were made with vector images, but since the skill icons were made by reducing the size of a picture, I couldn't help but shadow it myself. These initially strange icons become very miserable when they are zoomed-in, thanks to my drawing skill.... If you have ten thumbs like me, I recommend you to use vector images.... : (

There are lot more to tell about the graphic resources, but then this post will get too long... Like I said above, there's no fixed answer, so the best way is to find what the method that fits you.
But to emphasize one thing, the method with which you can make as many images as possible in a limited amount of time would be desirable. In other words, I believe that efficiency is the first priority in producing a graphic resource to a oneman army.
2. An efficient tool to substitute manpower.
What is as important as making the graphic resource, is to choose an efficient tool. As I'm not a team in which roles are specialized for each members, I have to do everything myself....
So it is wise to choose an efficient program that can substitute manpower. Even if you are developing the game alone, that doens't mean you are free from organizing tons of graphic, data, schedules, and documents.
Here, I introduce you the tool I felt the most productive.
-Unity
In the old days, many created a native code or engine themselves, but nowadays when game developing engines are becoming dramatically inexpensive, it seems universal to use one of such programs.Besides most of them are free to indie game developers...!! (Feels like an urgently promoting unity...)
Anyway, I chose Unity for the developing engine. Because Unity itself has the most suitable interface for an individual like me to work on. It allows development on component basis which facilitates the reuse of existing code, a perfect function for busy solo-developers. Plus there are tons of plug-ins adequate to most kinds of mobile platforms(e.g. facebook SDK or various advertisment modules) provided, which save great time for creating complicated native codes. Sometimes I feel as if I'm outsourcing this task to plug-in producers...

- Google Drive
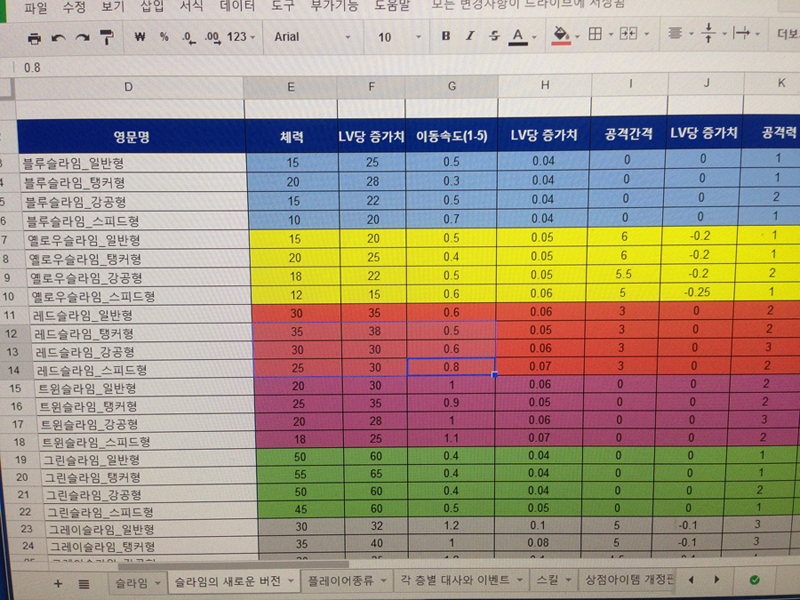
One thing one could easily neglect when developing a game alone is the organization of data. You might think this is not so important for a simple game like this one, but all games inevitably have a certain amount of numerical values involved. Before I didn't care about this very much, but as the game got near to its completion, such impromptu decision on characters' stats eventually caused the overall balance to collapse...Using Excel is fine, but I think Google Spreadsheet is better since it allows you to work when you're moving or outside. It provides a more effcient environment for organizing data.
Recently a tool interworking the Google drive and the stats of characters in the game was released, but I don't really recommend it due to the concern of safety and security.
-Trello
Originally this tool is more famous for organizing schedules based on tasks in a cooperation work. But if you are extremely diligent and a master of self-regulation, I guess you won't need it that much... When developing things alone, not in a time, it sometimes makes me think writing the task town on its own can seem like a waste of time.
Of course, I'm not a very diligent person, so I used Trello quite suitably. Especially when you are developing the game and at the same time working for a corporation, the rhythms of two different roles often get jumbled and messy, bringing this question to the mind: 'what am I doing right now!' Well, if you use Trello, you can organize how much you've done and how long you should work on more in a neat way, and this gives you a certain satisfaction with a will to administer oneself. Once again, note that if you are already good at controlling your own schedules, this can be just a waste of time..I wish I could be one of those people..

3. Test various prototypes
This is the biggest lesson I learned in this project.
I used to think that I created the prototypes in many diverse ways as I could, but in fact I tended to stick to the first prototype I made for I felt somewhat sorry to abandon it. This may not be only me, because when you're working alone, there's no one to apply a break on your thoughts, which easily lead to an arrogant idea that 'this must be fun to others, because it's fun to me!.' (...or is it just me again..)